Understanding and Implementing the Decorator Pattern in C#
This article explores the basics of the Decorator Pattern, discussing its utility and providing a rudimentary implementation in C#.
Background
In application development, there are scenarios where we need to create an object with basic functionality and then dynamically add extra features to it. For instance, consider creating a Stream object for handling data. In some cases, we might want the stream to support encryption. We could prepare the basic stream object and then dynamically add encryption functionality when needed.
One might argue: why not include the encryption logic directly in the Stream class and enable or disable it using a Boolean property? While possible, this approach introduces challenges, such as how to incorporate various types of encryption logic into a single class. This could be handled by subclassing the Stream class to implement custom encryption logic.
Subclassing works well if encryption is the only functionality that might need adding. However, if multiple dynamic functionalities (or combinations of them) are required, subclassing leads to a combinatorial explosion of derived classes, resulting in a maintenance nightmare.
This is precisely where the Decorator Pattern shines. The Gang of Four (GoF) defines the Decorator Pattern as: "Attach additional responsibilities to an object dynamically. Decorators provide a flexible alternative to subclassing for extending functionality."
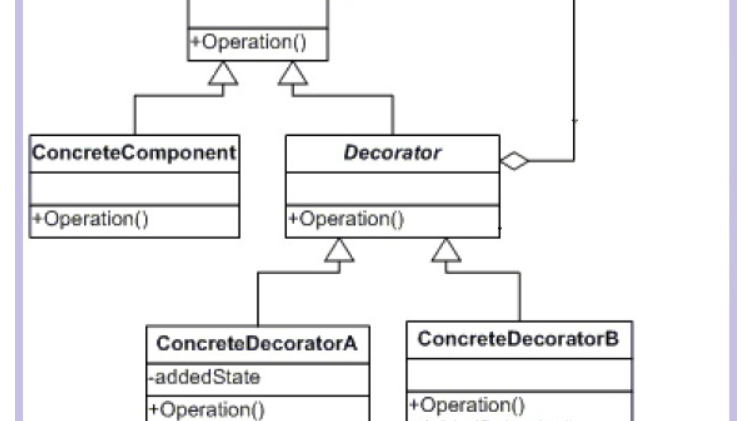
Before delving into its implementation, let’s review the Decorator Pattern's class diagram and the responsibilities of its components:
Using the Code
Let’s understand the Decorator Pattern through the example of a bakery billing system. The bakery sells cakes and pastries, and customers can add extras such as cream, cherries, scent, and a name card to the base products.
Problem with Subclassing
Using subclassing to implement this system would result in classes like:
And many more combinations! Maintaining such a class hierarchy is a nightmare. Instead, we can elegantly solve this problem using the Decorator Pattern.
Step 1: Define the Component Interface
public abstract class BakeryComponent
{
    public abstract string GetName();
    public abstract double GetPrice();
}
This interface defines the base object to which functionalities will be dynamically added.
Recommended by LinkedIn
Step 2: Implement the ConcreteComponent Classes
class CakeBase : BakeryComponent
{
    private string m_Name = "Cake Base";
    private double m_Price = 200.0;

    public override string GetName() => m_Name;
    public override double GetPrice() => m_Price;
}

class PastryBase : BakeryComponent
{
    private string m_Name = "Pastry Base";
    private double m_Price = 20.0;

    public override string GetName() => m_Name;
    public override double GetPrice() => m_Price;
}
Step 3: Implement the Decorator Class
public abstract class Decorator : BakeryComponent
{
    protected BakeryComponent m_BaseComponent;
    protected string m_Name = "Undefined Decorator";
    protected double m_Price = 0.0;

    protected Decorator(BakeryComponent baseComponent)
    {
        m_BaseComponent = baseComponent;
    }

    public override string GetName() =>
        $"{m_BaseComponent.GetName()}, {m_Name}";

    public override double GetPrice() =>
        m_BaseComponent.GetPrice() + m_Price;
}
The Decorator class implements the BakeryComponent interface. It also holds a reference to a BakeryComponent object to achieve a dynamic is-a relationship via composition.
Step 4: Implement the ConcreteDecorators
class CreamDecorator : Decorator
{
    public CreamDecorator(BakeryComponent baseComponent) : base(baseComponent)
    {
        m_Name = "Cream";
        m_Price = 1.0;
    }
}

class CherryDecorator : Decorator
{
    public CherryDecorator(BakeryComponent baseComponent) : base(baseComponent)
    {
        m_Name = "Cherry";
        m_Price = 2.0;
    }
}

class ArtificialScentDecorator : Decorator
{
    public ArtificialScentDecorator(BakeryComponent baseComponent) : base(baseComponent)
    {
        m_Name = "Artificial Scent";
        m_Price = 3.0;
    }
}

class NameCardDecorator : Decorator
{
    private int m_DiscountRate = 5;

    public NameCardDecorator(BakeryComponent baseComponent) : base(baseComponent)
    {
        m_Name = "Name Card";
        m_Price = 4.0;
    }

    public override string GetName() =>
        base.GetName() + $"\n(Please collect your discount card for {m_DiscountRate}%)";
}
Step 5: Client Code
The client code can dynamically combine decorators with the base components.
static void Main(string[] args)
{
    var cakeBase = new CakeBase();
    PrintProductDetails(cakeBase);

    var creamCake = new CreamDecorator(cakeBase);
    PrintProductDetails(creamCake);

    var cherryCake = new CherryDecorator(creamCake);
    PrintProductDetails(cherryCake);

    var scentedCake = new ArtificialScentDecorator(cherryCake);
    PrintProductDetails(scentedCake);

    var nameCardOnCake = new NameCardDecorator(scentedCake);
    PrintProductDetails(nameCardOnCake);
}
And when we run the application.
Before wrapping up lets look at how our sample application is implementing the decorator pattern in terms of class diagram and lets compare it with the class diagram of decorator pattern.
Conclusion
In this article, we explored the Decorator Pattern, its use cases, and how to implement it in C#. The Decorator Pattern exemplifies the Open-Closed Principle by allowing classes to be open for extension but closed for modification. I hope you found this discussion informative and helpful.
#CSharpProgramming #DesignPatterns #DecoratorPattern #SoftwareDevelopment