Step by step guide to building a Forward Proxy using NodeJs
Forward Proxy is an interesting concept which is used by the majority of organizations and institutions. Also referred to as a Proxy Server, it is simply a server that sits in between the clients and the public internet.
So, what is a Forward Proxy?
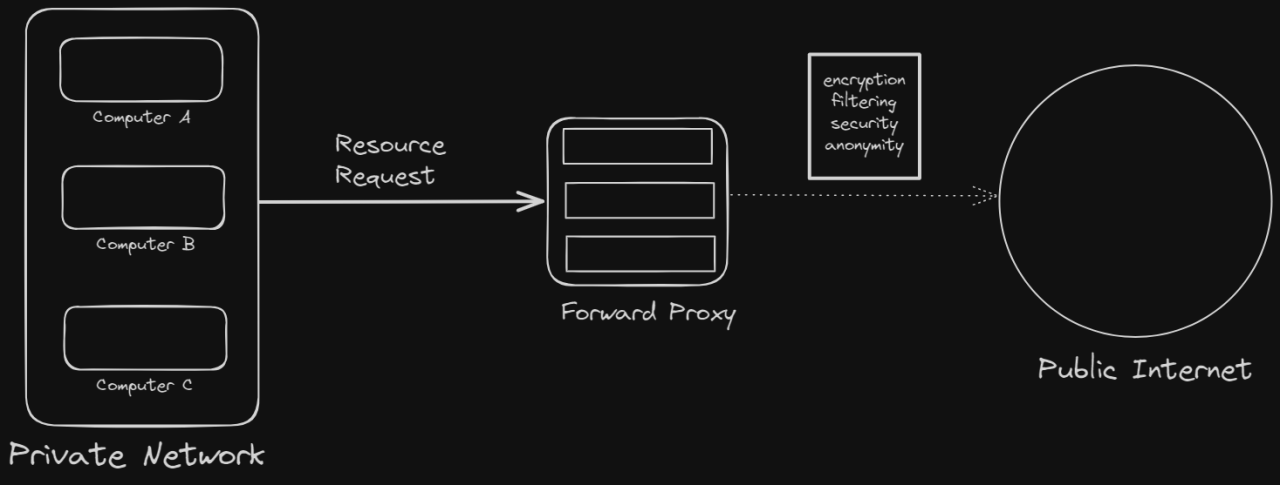
A forward Proxy is a server which sits between the user/client and intercepts its requests to a web server acting as an intermediate. All HTTP requests from the client’s device will go through the proxy server and be filtered based on the rules defined by the organization. So, it acts as a gateway between users and the internet.
So in essence, access to internal resources as well as external resources and sites can be protected, restricted, and monitored based on different access levels.
But what’s the point?
A Forward Proxy is mostly used for:
Organizations may want to protect certain resources behind a proxy server. This is required to protect the data behind an IP address and put restrictions so that it can not be accessed without proper authorization.
2. Caching
A forward proxy can also cache information and use it to process future requests.
3. Security
A forward proxy can inspect all web requests made by corporate user devices. The proxy can be used to block visits to unauthorized sites or to filter malicious or inappropriate content from responses.
4. User anonymity
User identification is easy when made directly to public resources. . Forward Proxies bypass this since now the request headers will have details about the proxy itself, hence protecting client identity.
5. Encryption
SSL Forward Proxy encrypts and decrypts incoming as well as outgoing traffic. This helps in better web security and prevents malicious attackers from intercepting.
Let’s create our Forward Proxy
The complete code can be found here
As stated, we will be using NodeJs to create a simple proxy server. So, go ahead and install nodejs on your system.
You can refer to: Instal Nodejs
Once installed, spin up your favorite IDE and run the following command in the terminal
npm init -y
This will create a package.json file in your code directory. This file is used to set up scripts and dependencies for your project.
Also install nodemon to help rerun your server automatically after any changes. This step is not compulsory, but definitely helps improve the development experience. Write the following command:
npm i nodemon -D
Now make some changes in your package.json file. Leave your dependencies section as is.
{
  "name": "forward-proxy",
  "version": "1.0.0",
  "description": "",
  "main": "server.js",
  "scripts": {
    "test": "echo \"Error: no test specified\" && exit 1",
    "start": "node server.js",
    "dev": "nodemon server.js"
  },
  "keywords": [],
  "author": "YOUR NAME",
  "license": "ISC"
}
Let’s create our main program file: server.js .Now, we set up our basic Node server. The call to net.createServer() method returns a new TCP server instance.
const net = require("net");
const app = net.createServer();
const PORT = process.env.PORT || 8080;app.listen({ host: "0.0.0.0", port: PORT }, () => {
  console.log("Server running on PORT:", PORT);
});
Now if you run
node server.js
You should get an output on your terminal showing you that your server is running.
Recommended by LinkedIn
Server running on PORT:8080
Now, we start setting up the proxy. We will be using the net module which comes inbuilt with nodejs. It triggers certain events whenever a new request comes to the server.
app.on("connection", (clientToProxySocket) => {
  console.log("Client connected to Proxy");
}
When a client connects to the server, it triggers the connection event. The event payload contains a socket object that represents the connection.
Now when the client sends data, the data event is emitted. We need to set up another event listener for the data event on the clientToProxySocket.
app.on("connection", (clientToProxySocket) => {
  console.log("Client connected to Proxy");
  clientToProxySocket.once("data", (data) => {
    console.log(data.toString());
    }
}
Requests can be either HTTP or HTTPS. We need to handle both accordingly.
clientToProxySocket.once("data", (data) => {
    let isConnectionTLS = data.toString().indexOf("CONNECT") !== -1;
    let serverPort;
    let serverAddress;

    if (isConnectionTLS) {
        serverPort = 443;

        serverAddress = data
           .toString().split("CONNECT")[1]
           .split(" ")[1]
           .split(":")[0];
    } else {
        serverPort=80;
        serverAddress = data.toString().split("Host: ")[1].split("\\n")[0];
    }
}
If the data contains a CONNECT request, we set the server port to 443 which is the default for HTTPS. The serverAddr is set to the hostname the client wants to connect to.
But, if there is not CONNECT request, we set the serverPort to 80, which is the default for HTTP and the serverAddr to the hostname.
So far we have established a connection between the client and the proxy server. Now, we need to connect the proxy to the actual resource the client wishes to connect to(the host server). We do this using the net.createConnection() function and configure it accordingly.
let proxyToServerSocket = net.createConnection(
      {
        host: serverAddr,
        port: serverPort,
      },
      () => {
        console.log("Proxy connected to server");
      }
    );
    if (isConnectionTLS) {
      clientToProxySocket.write("HTTP/1.1 200 OK\\r\\n\\n");
    } else {
      proxyToServerSocket.write(data);
    }
We connect the proxy to the requested server using the serverPort and serverAddr values. If it is a HTTPS request, we send a status 200, to inform the client that the connection was successful.
If it is an HTTP request, we write the data from the client to the server.
Now we need to set up a pipeline for proper data flow from the client to the proxy to the server and vice-versa. For this, we will create a two-way piping using the pipe() method. This is much simpler than it sounds.
Think of it this way- we have a connection from the client to the proxy(clientToProxySocket) and we have a connection from the proxy to the server(proxyToServerSocket). Now we need to connect these two.
clientToProxySocket.pipe(proxyToServerSocket);
    proxyToServerSocket.pipe(clientToProxySocket);
    proxyToServerSocket.on("error", (err) => {
      console.log("Proxy to server error");
      console.log(err);
    });    clientToProxySocket.on("error", (err) => {
      console.log("Client to proxy error");
    });
Any data written to the clientToProxySocket by the client will be automatically written to the proxyToServerSocket. Also, any data written to the proxyToServerSocket by the server will be automatically written to the clientToProxySocket.
We also set up a close event to track when the connection is stopped.
app.on("close", () => {
      console.log("Connection closed");
    });
Time for Testing
To test a proxy server, we need to configure the proxy settings on our system.
For Windows: Change Proxy settings manually
Set proxy Address to localhost and port to 8080
Now run the following command in your terminal.
npm run start
Now try to access any website in your browser. You should see similar logging in your terminal.
Proxy connected to server
Client connected to Proxy
CONNECT www.youtube.com:443 HTTP/1.1
Host: www.youtube.com:443
Proxy-Connection: keep-alive
Congratulations! You just created a Forward Proxy.🎉
Again, if you want the entire code here it is
A production server will generally have some encryption of outgoing data to prevent malicious attackers.
That’s it for this post. I hope you have a better understanding of how Forward Proxy works and its importance in software development.
For more informative posts, follow me on Twitter
Thank you for reading 🎉