Nginx Reverse Proxy Installation Steps and Settings
Nginx Reverse Proxy: Although Nginx is widely known as a lightweight and high-performance web server, it also functions as a reverse proxy. A reverse proxy server receives requests from clients, forwards them to one or more backend servers, and then returns the responses to the clients.
This setup offers several advantages in large-scale web applications, such as:
Advantages of Nginx Reverse Proxy:
Load Balancing:
Security and Privacy:
SSL Termination:
Caching:
Scalability:
How Does It Work?
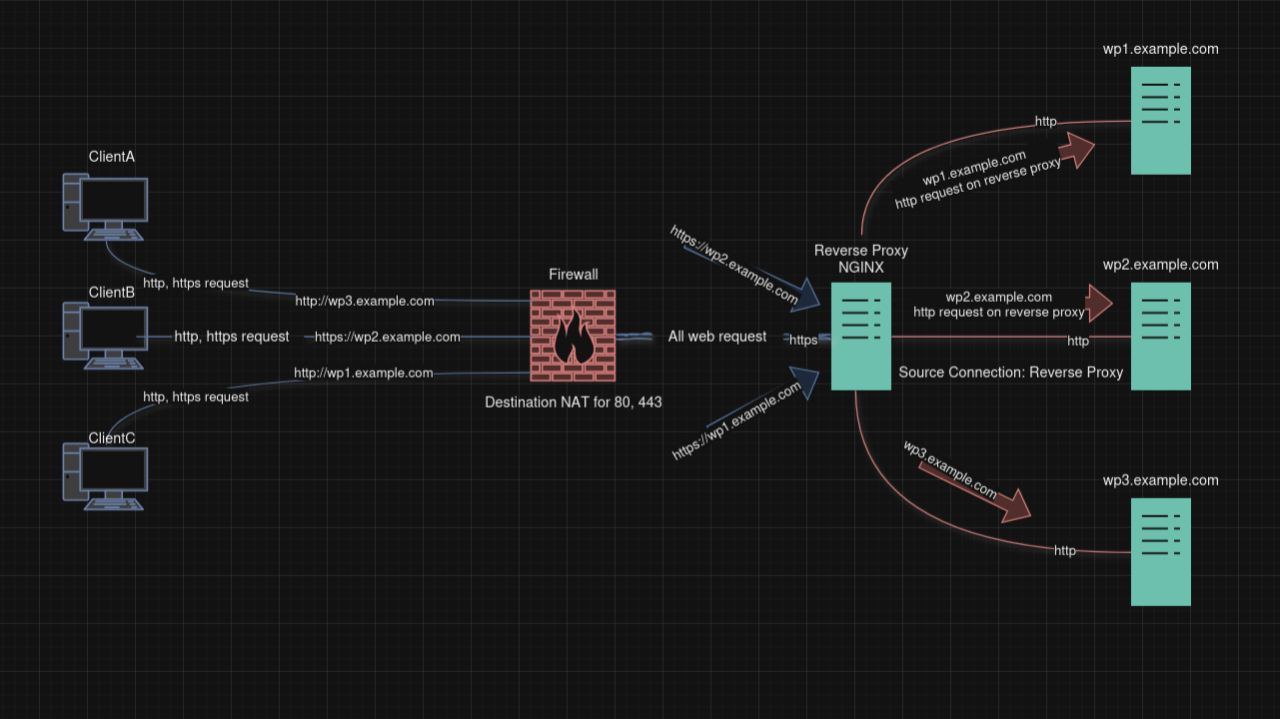
When a client sends a request to a website, that request is first received by the Nginx server. Nginx then forwards the request to the backend servers based on predefined rules. The response from the backend is returned to Nginx, which then sends it back to the client. Clients interact only with Nginx and do not know where the backend servers are located.
In this example:
Installation Steps:
Currently, in our scenario, we have 3 WordPress servers located on the DMZ network. HTTP requests are coming to these servers through a reverse proxy ( on a separate network ). Bellow, I will show the installation and configuration steps on the reverse proxy server for each WordPress server. All installation and configuration steps have been performed on a Debian operating system.
Connect to the Nginx Reverse Proxy server via SSH.
Example: ssh user@10.x.x.10
Install Nginx
sudo apt update && sudo apt upgrade -y
sudo apt install nginx
Disable the default virtual server.
sudo unlink /etc/nginx/sites-enabled/default
Create an Nginx Reverse Proxy.
cd /etc/nginx/sites-available/
sudo touch wp1.example.com
sudo touch wp2.example.com
sudo touch wp3.example.com
Note: You can create your projects in different files to make management easier. However, if you want a more performant configuration, you can create a single file and add all your WordPress servers into it.
sudo nano wp1.example.com
Recommended by LinkedIn
server {

listen 80;

server_name wp1.example.com www.wp1.example.com;

location / {

proxy_set_header Host $http_host;

proxy_set_header X-Real-IP $remot_addr;

proxy_set_header X-Forwarded-For $proxy_add_x_forwarded_for;

proxy_set_header X-Forwarded-Proto $scheme;

proxy_set_header X-Forwarded-Server $host;

proxy_pass http://wp1.example.com #forward to wp1 server local address

    }

}
Since we have disabled the default configuration file and created project files separately,
Nginx requires a symlink for each project configuration.
sudo ln -s /etc/nginx/sites-available/wp1.example.com /etc/nginx/sites-enabled/wp1.example.com
After the configuration settings, Let's restart the Nginx service
sudo service nginx restart
SSL connection requests will first be handled by the Nginx reverse proxy server. Therefore, an SSL certificate needs to be created for each project on the Nginx reverse proxy. The Nginx reverse proxy server forwards the incoming SSL requests to the WordPress servers located in the DMZ via HTTP requests and reflects the result back to the client as HTTPS. Now, let's install SSL for each project using Certbot.
Install Certbot
sudo apt install certbot python3-certbot-nginx
Create SSL for our domain
sudo certbot --nginx -d wp1.example.com -d www.wp1.example.com
Reload Nginx
sudo systemctl reload nginx
Verifying Certbot Auto Renewal
sudo certbot renew -dry-run
Status timer of Certbot
sudo systemctl status certbot.timer
After the SSL installation, your configuration will look like the following.
cat wp1.example.com
server {

server_name wp1.example.com www.wp1.example.com;

location / {

proxy_set_header Host $http_host;

proxy_set_header X-Real-IP $remot_addr;

proxy_set_header X-Forwarded-For $proxy_add_x_forwarded_for;

proxy_set_header X-Forwarded-Proto $scheme;

proxy_set_header X-Forwarded-Server $host;

proxy_pass http://wp1.example.com;  #forward to wp1 server local address

    }

    listen 443 ssl; # managed by Certbot
    ssl_certificate /etc/letsencrypt/live/wp1.example.com/fullchain.pem; # managed by Certbot
    ssl_certificate_key /etc/letsencrypt/live/wp1.example.com/privkey.pem; # managed by Certbot
    include /etc/letsencrypt/options-ssl-nginx.conf; # managed by Certbot
    ssl_dhparam /etc/letsencrypt/ssl-dhparams.pem; # managed by Certbot

}
server {
    if ($host = wp1.example.com) {
        return 301 https://$host$request_uri;
    } # managed by Certbot


    if ($host = wp1.example.com) {
        return 301 https://$host$request_uri;
    } # managed by Certbot


    listen 80;
    server_name wp1.example.com wp1.example.com;
    return 404; # managed by Certbot

}
Conclusion:
Nginx reverse proxy is a powerful solution for creating scalable, secure, and high-performance web server architectures. With features like load balancing, caching, and SSL termination, it is widely used in large websites and distributed systems.
Nginx restart services
sudo systemctl restart nginx
Nginx status services
sudo systemctl status nginx
Nginx enable services
sudo systemctl enable nginx
Note;
Reverse Proxy Server is working on WEB DMZ Network in Firewall (PaloAlto)
WP's servers are working on SRV DMZ Network in Firewall (PaloAlto)
You can access more detailed information for your projects from the source below.
#Nginx #Debian #Mariadb #php #LEMP #Firewall #Paloalto #DestinationNAT #NginxReverseProxy