Implementing Event-Driven in .Net Core 5
The event-driven is an architecture that uses events to communicate changes of states to applications that are interested in different events.
This type of architecture decouples services by using Service buses. This allows the services involved to be scaled, updated, and deployed independently.
This post will explain how to implement an event-driven architecture with MassTransit (a library to configure and send events messages to a Message broker) and RabbitMQ (a message broker that handles events messages).
The solution is composed of 4 parts.
A simple scenario:
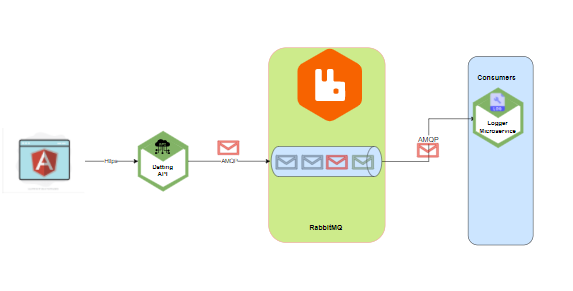
To understand how it works we'll go through the next scenario.
1.- The user registers in the Angular app
2.- The Dating API receives the petition and registers the User in their database.
3.- The Dating API sends a RegisteredCommand using MassTransit to RabbitMQ queue.
4.- The Logger Microservice that is a Consumer/Subscribed Service to the RegisteredCommand will get the message using MassTransit and will log the message. (For this example will log only on the terminal)
Section of this article.
This post is divided into 4 sections:
Section 1.- What is the LogerMicorservice and what is the Dating APP and how does it implement to implements CQRS.
What is Logger Microservice?
The Logger Microservice is just a small application inside the solution that is subscribed to the RegisterUserCreatedCommand event. It is the Consumer and it will be listening for the new-user-registered event.
It is in charge of logging in to the console each time a new user gets registered.
What is the Dating APP?
The Dating APP is a Web API application that sends the RegisterUserCreatedCommand event to the RabbitMQ queue using the MassTransit framework (Explained below).
This project implements the CQRS pattern using the MediatR library.
Note: It is important to not mix the MassTransit commands used by MassTransit to communicate the events externally with the commands used by MediatR for the internal communication inside the DatingApp. For this example, there is only one command used by MassTransit (RegisterUserCreatedCommand) all others will be used by MediatR.
CQRS (Commands and Queries Responsibility Segregation) is a pattern that tells you to divide your read-only requests (Queries)and your writing request (Commands) and to put all the logic in Handlers.
The main idea is to go to different databases specialized and optimized each one for a different purpose. One for reading and one for updating.
Although this is the main advantage when implementing CQRS, by implementing it using the MediatR library we get more internal advantages.
For example, the logic of the application is moved into Handlers. This makes it easier to maintain and easier to create unit tests.
The commands are sent from the controller to the handlers and they need to implement from IRequest<T> and they contain transport the information needed in the Handlers.
Controllers become orchestrators and all the logic is moved into the handlers.
IPipelineBahaviours
Validations and caching can be placed in one place by implementing IPipelineBahaviour. The pipelines behaviors act as a middleware for the commands and queries, which means that all commands and queries will go through these Pipelines which makes it possible to have a centralized validator and caching.
The Validation logic.
The validators
To validate a command or a query they need to implements the library fluent validator. Fluent Validator is a library that helps to write more readable validators and to write validations easily.
In our scenario, each time a RegisterUserCommand is sent through the mediator, the information contained in the command will be validated by the rules inside RegisterUserCommandValidator.
Now all validations will exist only in one place and with the fluent validator library, it is Teasy to write complex validations.
The cache pipeline behavior
In the same way, requests go through the pipeline to get validated, it is possible to implement a cache for the incoming query requests.
Look in the next image how easy is to create a new Behaviour and implement an IMemoryCache in the incoming queries requests.
Section 2.- How to implement distributed systems using MassTransit and RabbitMQ
What is MassTransit?
MassTransit is a free, open-source distributed application framework for DotNET. MassTransit makes it easy to create applications and services that leverage message-based, loosely-coupled asynchronous communication for higher availability, reliability, and scalability.
5 parts are needed in order to implement a driven event architecture
Implementing TransMassive in the Producer (DatingAPP)
1.- Install the NuGet package MassTransit.RabbitMQ, MassTransit.Extensions.DependencyInjection, MassTransit.AspNetCore.
2.- Add a new configuration section in the appsettings.json
3.- Add a new configuration class to serialize the RabbitMqSettings in the appsettings.json.
4.- Add the MassTransit to the service collection the RabbitMQ configuration.
Recommended by LinkedIn
5.- Create the Command that will be shared between the Producer and the Consumer. Create the command in a common library project so they can share the same object.
6.- Add the reference to the Common library project to be able to reference the RegisterUserCreatedCommand.
7.- Use MassTransit to send the command to the RabbitMQ queue.
Implementing TransMassive in the Consumer (Logger Microservice)
1.- Install the Nuget package MassTransit.RabbitMQ
2.- Add a reference to the common library project so the project can reference the RegisterUserCreatedCommand.
3..- Create the BusControl with the next configuration
Section 3. RabbitMQ
RabbitMQ is a messaging broker - an intermediary for messaging. It gives your applications a common platform to send and receive messages, and your messages a safe place to live until received.
For testing purposes, the RabbitMQ server will be installed using docker by running the next command:
docker run -it --rm --name rabbitmq -p 5672:5672 -p 15672:15672 rabbitmq:3-management
Check that RabbitMQ is running by going to the management web page. (http://localhost:15672)
Section 4: Testing.
To test the application it is needed to run the applications.
Go to the registration page on http://localhost:4200
Check that the response was successful (code 201) in the DatingAPP console:
Check that the logger-microservice received the event message with the new user Id
In the RabbitMQ management application, it is possible to see that the queue was created
The code can be found in this Github link
UPDATE JAN 28 2022
The update is about how to run microservices locally easily using dotnet Tye.
Tye is a developer tool that makes developing, testing, and deploying microservices and distributed applications easier. Project Tye includes a local orchestrator to make developing microservices easier and the ability to deploy microservices to Kubernetes with minimal configuration.
Tye allows running all our services with just one command.
First, need to install Tye. The available version for me is 0.10.0-alpha.21420.1
dotnet tool install --global Microsoft.Tye --version 0.10.0-alpha.21420.1
Second, need to create a Tye File
tye init
By default, tye will find all .net core projects and add them to the tye.yaml file.
Third, add the missing services from Docker (RabbitMq and Angular app).
Finally, run tye.
run tye
How to add the Angular Application into the Docker Hub.
No need to follow the next steps because my application is already in my Docker Hub and anyone has access to the Docker container.
As I said before the Rabbit MQ service and the angular app should exist in the Docker Registry.
In my case, I had to add my angular application to my Docker Hub by adding the docker file inside the application folder.
Generate the docker image
command example:
docker build -t dockerhub_name/image_name:tag dockerfile_location

docker build -t mavidocker/angular-app:latest .
I uploaded the docker image to my docker Hub
docker login

docker push mavidocker/angular-app:latest


