Cracking the Kubernetes Code | Decoding Kubernetes Architecture | AWS EKS Deployment
Kubernetes is a powerful open-source platform designed to automate deploying, scaling, and operating application containers. Its architecture is composed of several key components that work together to maintain the desired state of applications. Here’s a detailed look at the architecture:
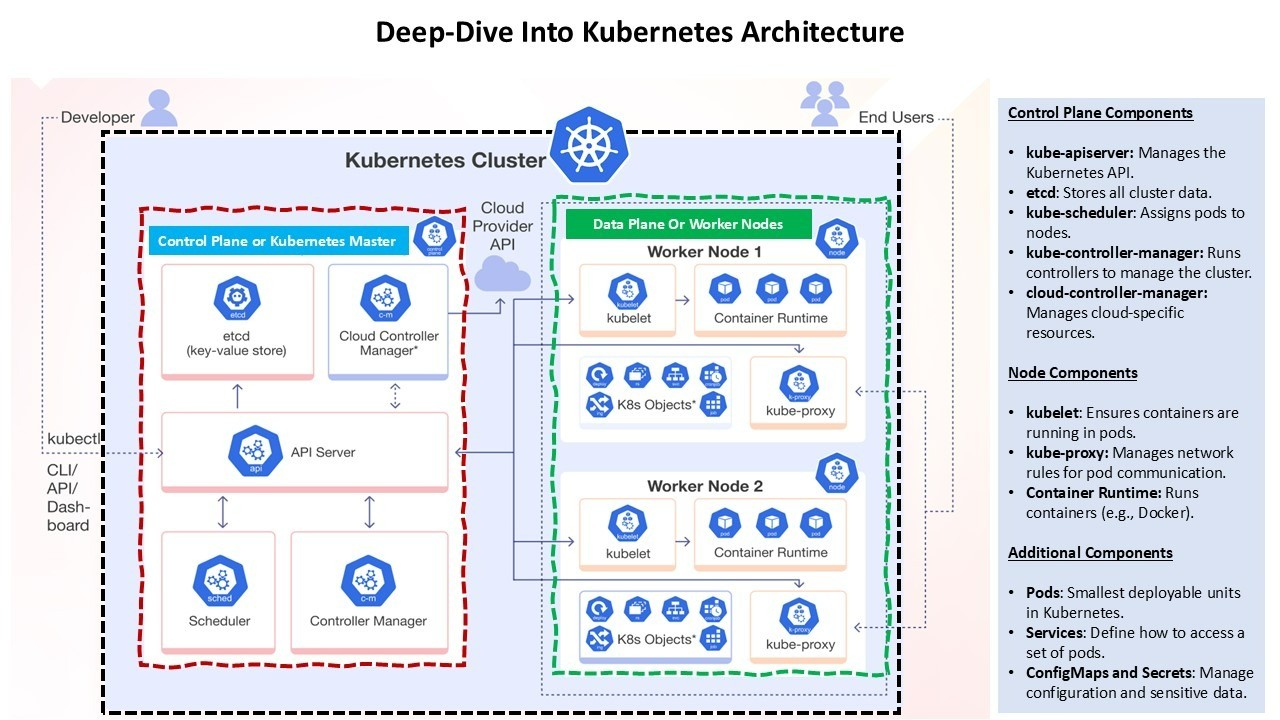
1. Control Plane
The control plane is responsible for managing the Kubernetes cluster. It consists of several components:
2. Node Components
Nodes are the worker machines in Kubernetes. Each node runs several components necessary for managing the pods:
3. Networking
Kubernetes networking is designed to provide a flat network structure where each pod can communicate with any other pod without NAT. Key components include:
4. Security
Security in Kubernetes is multi-faceted and includes:
5. Monitoring and Logging
Monitoring and logging are crucial for maintaining the health and performance of a Kubernetes cluster:
Amazon Elastic Kubernetes Service (EKS)
Amazon Elastic Kubernetes Service (EKS) is a managed service that simplifies running Kubernetes on AWS without needing to install and operate your own Kubernetes control plane or nodes. Here’s a closer look at what makes AWS EKS a powerful tool for developers and businesses:
Key Features of AWS EKS:
Benefits of Using AWS EKS:
Recommended by LinkedIn
Deployment Scripts and YAML Files
To deploy a sample application on AWS EKS, follow these steps:
Step 1: Create an EKS Cluster
You can create an EKS cluster using the AWS Management Console, AWS CLI, or eksctl. Here’s an example using eksctl:
eksctl create cluster --name my-cluster --region us-west-2 --nodegroup-name linux-nodes --node-type t3.medium --nodes 3 --nodes-min 1 --nodes-max 4 --managed
Step 2: Create a Namespace
Namespaces allow you to group resources in Kubernetes. Create a namespace for your application:
kubectl create namespace eks-sample-app
Step 3: Create a Deployment
Save the following contents to a file named eks-sample-deployment.yaml. This deployment pulls a container image from a public repository and deploys three replicas to your cluster.
apiVersion: apps/v1
kind: Deployment
metadata:
  name: eks-sample-deployment
  namespace: eks-sample-app
  labels:
    app: eks-sample-app
spec:
  replicas: 3
  selector:
    matchLabels:
      app: eks-sample-app
  template:
    metadata:
      labels:
        app: eks-sample-app
    spec:
      containers:
      - name: nginx
        image: public.ecr.aws/nginx/nginx:1.23
        ports:
        - containerPort: 80
Apply the deployment manifest to your cluster:
kubectl apply -f eks-sample-deployment.yaml
Step 4: Create a Service
Save the following contents to a file named eks-sample-service.yaml. This service allows you to access all replicas through a single IP address or name.
apiVersion: v1
kind: Service
metadata:
  name: eks-sample-service
  namespace: eks-sample-app
  labels:
    app: eks-sample-app
spec:
  selector:
    app: eks-sample-app
  ports:
  - protocol: TCP
    port: 80
    targetPort: 80
  type: LoadBalancer
Apply the service manifest to your cluster:
kubectl apply -f eks-sample-service.yaml
Step 5: Verify the Deployment
Check the status of your deployment and service:
kubectl get all -n eks-sample-app
This command will list all resources in the eks-sample-app namespace, including pods, services, and deployments.
Conclusion
Kubernetes architecture is designed to provide a robust, scalable, and flexible platform for running containerized applications. By understanding the roles of each component and how they interact, you can effectively manage and optimize your Kubernetes clusters.Whether you are using AWS EKS or another Kubernetes service, the principles remain the same, allowing you to focus on deploying and scaling your applications efficiently.
-- Alok Saraswat
-- Reference -- kubernetes.io & Amazon web service documentation


